Getting started
ShopNative comes ready to run. The project is connected to our demo store (Luma Store), so you can build it and see a working app before you change anything. Then connect your own Shopify store in a few steps.
1. Install the tools
- Flutter 3.44 or newer (Dart 3.12+): https://docs.flutter.dev/get-started/install
- Android: Android Studio with the Android SDK (the app runs on Android 7.0 / API 24 and newer)
- iOS (optional): a Mac with Xcode (the app runs on iOS 15 and newer)
Check your setup with flutter doctor.
2. Build the demo app (no changes needed)
Unzip the download and open a terminal in the shopnative folder (the folder that contains pubspec.yaml):
Windows: unzip to a short path such as
C:\dev\ShopNative. Very long folder paths (over 260 characters, e.g. deep inside Downloads or a synced folder) make the Flutter tool fail with "Directory listing failed".
flutter pub get
flutter run                     # on a connected phone, emulator or iOS simulator
Or build an installable APK:
flutter build apk --debug       # → build/app/outputs/flutter-apk/app-debug.apk
flutter build apk --release     # → build/app/outputs/flutter-apk/app-release.apk
The release APK is signed with the debug key until you add your own (see step 4). You can also open the
shopnative folder in Android Studio or VS Code and press Run.
What to try in the demo
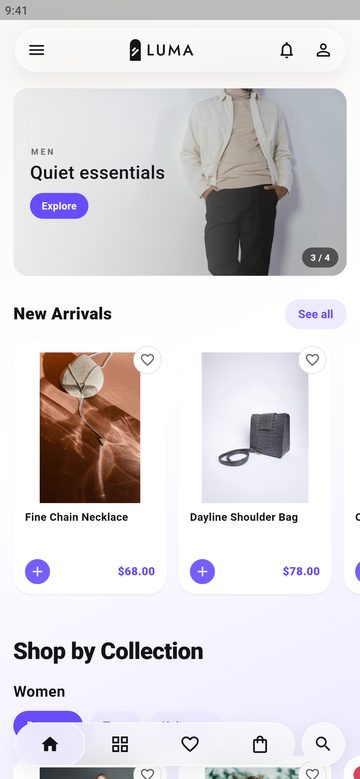
- Home: banners, New Arrivals, "Shop by collection" rows built from the store menu
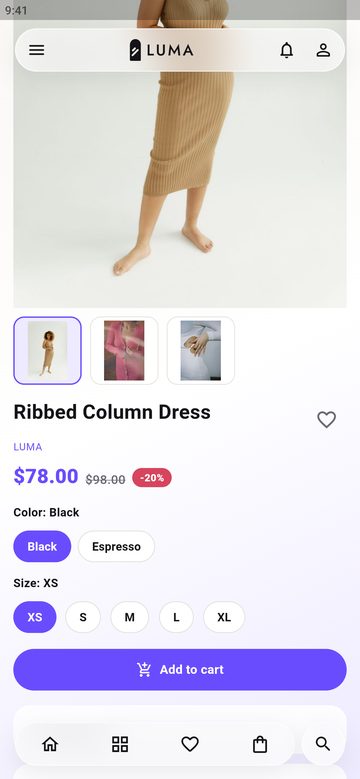
- Collections, search, a product with sizes and colours (sold-out options are struck through), sale prices
- Cart, wishlist, notifications
- Settings (side menu): light / dark mode and English / Arabic (right-to-left)
- Account: sign in with any email address; Shopify sends a one-time code
- Checkout: the demo is a Shopify development store, which is password protected. Checkout shows Shopify's
password page unless you are signed in; the demo store password is
123456789. Your own (paid) store does not have this page.
Run the tests (optional)
flutter test
3. Connect your own store
- Set up the free Shopify Headless channel and copy your keys: Shopify setup.
- In
assets/app-config.json, replace the demo values instore(domain,storefrontToken,customerAccountClientId,customerAccountRedirectUri) with yours. - Replace the four demo banners in
home.bannerswith your own images (or remove them). - Change
app.id(for examplecom.yourcompany.store) andapp.name, then run:dart run tool/rebrand.dart flutter runagain: the app now shows your products.
Then follow the Rebranding checklist for your logo, app icon and colours. Every setting is described in Configuration.
The demo store keys in
app-config.jsonare public Storefront and Customer Account keys (the same kind every Shopify app ships with). They only allow reading products and creating carts on the demo store. The demo store is kept online for testing, but it may change at any time: always connect your own store before you publish.
4. Publish
When the app shows your store and your brand, build the release versions:
flutter build appbundle --release --obfuscate --split-debug-info=build/symbols   # Google Play
flutter build ipa --release --obfuscate --split-debug-info=build/symbols         # App Store (on a Mac)
For Google Play, sign the app with your own key: copy android/key.properties.example to android/key.properties
and point it to your keystore. Without it, release builds use the debug key (fine for testing, not for Google Play).
5. Project structure
shopnative/
  assets/
    app-config.json        your store, brand, home page and support settings (see Configuration)
    brand/                 logo, symbol and app icon images
    i18n/                  one JSON file per language (en.json, ar.json)
  lib/
    main.dart              starts the app: creates the AppStore, then runs ShopNativeApp
    app.dart               ShopNativeApp: theme, languages, right-to-left
    config/                app_config.dart (reads app-config.json), theme.dart (light and dark themes)
    data/                  Shopify connection: storefront_api.dart, customer_account_api.dart, disk cache
      models/              product, catalog, cart and customer models
    state/                 app state (cart, catalog, customer, settings), shared through StoreScope
    i18n/                  strings.dart: loads the translations from assets/i18n
    ui/
      shell/               app frame: header, bottom bar, side menu, search, links from notifications
      screens/             one file per screen: home, collections, product, cart, checkout, account, ...
      kit/                 small reusable widgets: buttons, product card, glass panels, images
  addons/push/             optional push notifications add-on (Firebase)
  tool/rebrand.dart        applies app id, name and version to Android and iOS
  test/                    unit and widget tests (flutter test)
  android/  ios/           native projects (normally you only change them through rebrand.dart)
Most changes need only assets/: store keys, colours, banners, menus and texts. Change the code in lib/ui/ when you
want a different layout.
Shopify setup
ShopNative talks to your store through two official Shopify APIs. Both are set up in the free Headless sales channel. No Shopify app or server is needed.
| API | Used for | What you copy into assets/app-config.json |
|---|---|---|
| Storefront API | Products, collections, menu, search, cart, checkout | store.storefrontToken |
| Customer Account API | Sign in, profile, orders, addresses | store.customerAccountClientId, store.customerAccountRedirectUri |
1. Install the Headless channel
- Shopify admin → Settings → Apps and sales channels → Shopify App Store, search Headless, install it (made by Shopify, free).
- Open Sales channels → Headless → Create storefront.
2. Storefront API token
- In your storefront: Storefront API → Manage.
- Copy the Public access token into
store.storefrontToken. - Put your shop domain in
store.domain, e.g.your-store.myshopify.com.
Never use the private token or an Admin API token (starting with
shpat_). Those give full access to your store and must never be put in an app. ShopNative refusesshpat_tokens.
Permissions: the Headless channel's default Storefront API permissions are enough. If you changed them, make sure products, collections, navigation menus, inventory (for "sold out") and checkouts are allowed.
3. Customer login (Customer Account API)
- In your storefront: Customer Account API → Manage.
- Client type → Public (mobile app). "Public (web app)" will not work and shows "Invalid redirect_uri scheme".
- Copy the Client ID into
store.customerAccountClientId. - Find your shop ID: it is the number in the Authorization endpoint shown on the same page, e.g.
https://shopify.com/authentication/71533101190/oauth/authorize→71533101190. - Under Callback URI(s) add exactly:
Do not addshop.<your-shop-id>.app://callbackhttps://in front, even though the page says "include HTTPS". If you see "Redirect uri is not secured", the client type is still "web app" (step 2). - Put the same value in
store.customerAccountRedirectUri. - Customer accounts must be on: Settings → Customer accounts → Customer accounts (the new version).
When a customer is signed in in the app, checkout opens signed in too (saved addresses, order linked to the account).
4. Collections, menu and images
| In Shopify | Used in the app |
|---|---|
| Collections that have products | Collections tab (all of them, with their image) |
Content → Menus → Main menu (handle main-menu) |
Side menu, and "Shop by collection" rows on the home screen (a top-level item with collection sub-items becomes a row with chips) |
A collection for new products, e.g. handle new-arrivals |
"New Arrivals" row (home.newArrivalsCollection) |
| Collection image (1200 × 1200, subject centered) | Collection tiles |
| Product images | Product cards, gallery, cart, orders |
| Settings → Policies | Policies screen (refund, shipping, privacy, terms) |
Menu items that are not collections also work: / opens Home, /pages/contact opens Contact, product links open the
product, other links open in the in-app browser.
5. Checkout and payments
Checkout is Shopify's own checkout, shown inside the app. Payments, taxes, shipping, discounts and order emails all come from your Shopify settings. After a successful order the app closes checkout, empties the cart and shows a thank-you screen.
Development stores are password protected; checkout asks for the store password unless the customer is signed
in. To test payments use Settings → Payments → (for testing) Bogus Gateway and card number 1.
Troubleshooting
| Message | Fix |
|---|---|
| "Missing Shopify Storefront API token" | store.storefrontToken is empty or still YOUR_.... |
| "...is a Shopify Admin API token" | You pasted a shpat_ token. Use the public Storefront token. |
| Login: "Invalid redirect_uri scheme" | Client type must be Public (mobile app). |
| Login: "Redirect uri is not secured" | Same as above; then add the callback without https://. |
| Login opens but never returns to the app | customerAccountRedirectUri in the config must match the callback URI in Shopify exactly. Rebuild the app after changing it. |
| Collections tab is empty | Collections need at least one product and must be available on the Headless channel. |
| Home has no "Shop by collection" rows | Add collections with sub-collections to the Main menu. |
| Windows: "Directory listing failed" / "cannot find the path" | The project folder path is too long. Move it to a short path such as C:\dev\ShopNative. |
| Checkout shows a password page | Development store: sign in first, or enter the store password. |
Configuration reference
Everything is configured in one file: assets/app-config.json. No Dart code changes are needed.
After editing:
- Android: just rebuild (
flutter run/flutter build). Android reads the app identity directly from this file. - iOS: run
dart run tool/rebrand.dartonce after changing theappsection, then rebuild.
Text values starting with YOUR_ are treated as empty.
app: identity
| Key | Example | Notes |
|---|---|---|
id |
com.yourbrand.store |
Package name (Android) and bundle ID (iOS). Cannot be changed after the first store upload. |
name |
Your Store |
Name under the app icon. |
version |
1.0.0 |
Version shown in the stores. |
build |
1 |
Increase by 1 for every upload to Google Play / App Store. |
store: Shopify connection
See SHOPIFY_SETUP.md for where to find each value.
| Key | Required | Notes |
|---|---|---|
domain |
yes | your-store.myshopify.com |
storefrontToken |
yes | Public Storefront API access token |
customerAccountClientId |
for login | Customer Account API client ID (client type: Public, mobile app) |
customerAccountRedirectUri |
for login | shop.<shop-id>.app://callback (no https://) |
websiteUrl |
no | Your public website, used for product links and policy pages. Default: https://<domain> |
apiVersion |
no | Storefront API version, default 2026-04 |
brand
| Key | Notes |
|---|---|
name |
Store name in texts (footer, messages). |
tagline |
Shown on the startup screen (spaced capitals). Optional. |
logoAsset / logoAssetDark |
Header logo bundled in the app (PNG, about 600 px wide), for light and dark mode. |
symbolAsset / symbolAssetDark |
Startup screen symbol (PNG). |
logoUrl |
Header logo from a URL, used when no logoAsset is set. If neither is set, the name is shown as text. |
themeMode |
system, light or dark: the default before the user picks one in Settings. |
colors |
Light mode colours (below). |
darkColors |
Dark mode colours, same keys. Optional: derived from colors when missing. |
Colours (#RRGGBB or #AARRGGBB):
| Key | Used for |
|---|---|
primary |
Buttons, prices, links, selected states, badges |
primarySoft |
Light tint for chips and soft buttons (derived from primary if omitted) |
onPrimary |
Text on primary buttons. Use dark text when primary is light. |
textPrimary |
Headings and important text |
textSecondary |
Body text, hints, captions |
background |
Screen background (also the Android launch screen, via tool/rebrand.dart) |
surface |
Cards, inputs, panels |
border |
Outlines of inputs, cards, chips |
icon |
Header and navigation icons |
favorite |
Active wishlist heart |
sale |
"Sale" badge on products with a compare-at price |
error |
Error messages and destructive actions |
Check contrast: text on background and onPrimary on primary should be at least 4.5 : 1.
i18n: languages
| Key | Example | Notes |
|---|---|---|
languages |
["en", "ar"] |
Languages users can pick in Settings. Each needs assets/i18n/<code>.json. |
defaultLanguage |
en |
Language on first start. |
Right-to-left layout is automatic for Arabic, Persian, Hebrew and Urdu. To add a language, copy assets/i18n/en.json
to e.g. fr.json, translate the values (keep the keys and {placeholders}), and add "fr" to languages.
The test suite checks that every language has all keys.
home
| Key | Notes |
|---|---|
menuHandle |
Shopify navigation menu used for the side menu and home rows. Default main-menu. |
newArrivalsCollection |
Collection handle for the "New Arrivals" row. |
allProductsCollection |
Collection used for the full catalog. Default all (Shopify's built-in all-products collection). |
banners |
Home carousel, see below. Remove all items to hide it. |
Banners:
{
  "collection": "new-arrivals",
  "image": "https://cdn.shopify.com/.../banner.webp",
  "eyebrow": { "en": "New season", "ar": "موسم جديد" },
  "headline": { "en": "Wear the light", "ar": "ارتدِ النور" },
  "button": { "en": "Shop now", "ar": "تسوّق الآن" }
}
| Key | Notes |
|---|---|
collection |
Collection handle opened on tap (required). |
image |
URL (upload to Shopify → Content → Files) or a bundled path starting with assets/. 1600 × 900 px, JPG/WebP under 300 KB. |
eyebrow, headline, button |
Optional text drawn over the image. A plain string, or one value per language. |
With text, keep the left 45 % of the photo calm (the text sits there) and the subject on the right; keep the bottom-right corner clear (page counter). In right-to-left languages the photo is mirrored automatically.
support
title, address, phone, whatsapp, email. Shown on the Contact screen and used by "Check availability" and
"Call for price". Empty values are hidden.
features
| Key | Notes |
|---|---|
availabilityCheck |
Shows "Check availability" on product pages (needs at least one support contact). |
taxLabels.enabled |
Shows a tax label next to prices, based on the variant's taxable setting. |
taxLabels.taxable / nonTaxable |
Label texts, e.g. excl. VAT / incl. VAT. |
taxLabels.taxableNote |
Small note under taxable prices. |
Products priced at 0 show Call for price, which contacts the store by WhatsApp, phone or email (first one set).
Rebranding checklist
Turn ShopNative into your store's app in about an hour.
1. Identity and store
- Edit
assets/app-config.json:app(id, name, version),store(see SHOPIFY_SETUP.md). - Run:
dart run tool/rebrand.dart --check   # validates the config and shows what will change
dart run tool/rebrand.dart           # applies it to the iOS project, pubspec and launch screen
2. Logo
Replace these PNG files (keep the names, or change the paths in brand):
| File | Size | Shown |
|---|---|---|
assets/brand/logo.png |
~600 px wide, transparent | Header, light mode |
assets/brand/logo-dark.png |
same | Header, dark mode (light-coloured logo) |
assets/brand/symbol.png |
~240 px wide, transparent | Startup screen, light mode |
assets/brand/symbol-dark.png |
same | Startup screen, dark mode |
No logo yet? Delete logoAsset and logoAssetDark from the config: the header shows your store name as text.
3. App icon
- Replace
assets/brand/app-icon.png: 1024 × 1024, square, no transparency, no rounded corners (iOS and Android round it themselves). Keep the important part inside the middle 60 %. - Replace
assets/brand/app-icon-foreground.png: the same artwork on a transparent background (Android adaptive icon layer), and setadaptive_icon_backgroundinpubspec.yamlto your icon's background colour. - Run
dart run flutter_launcher_icons.
4. Colours
Set brand.colors and brand.darkColors (see CONFIGURATION.md). Run
dart run tool/rebrand.dart again so the launch screen colour matches.
5. Home banners
Upload 1600 × 900 images to Shopify → Content → Files and list them in home.banners with optional text.
6. Texts and languages
All texts are in assets/i18n/*.json. Change wording there; add or remove languages in i18n.languages.
7. Store listing
Before publishing: test sign in, add to cart, checkout (with a test payment), and dark mode / your languages on a real device. Then build:
flutter build appbundle --release --obfuscate --split-debug-info=build/symbols   # Google Play
flutter build ipa --release --obfuscate --split-debug-info=build/symbols         # App Store (on a Mac)
Keep the build/symbols folder of every release: it is needed to read crash reports.
Push notifications add-on (optional)
Send notifications ("New collection is live", "Summer sale -30 %") from the free Firebase console. Tapping a notification can open a product, a collection or the cart.
ShopNative ships without Firebase, so the app works without any Firebase account or setup files. Enabling this add-on takes about 20 minutes and adds Firebase Messaging (about 0.3 MB on Android, measured on a release build).
1. Create a Firebase project
- Go to https://console.firebase.google.com → Add project.
- Install the tools (once):
dart pub global activate flutterfire_cli npm install -g firebase-tools # or see https://firebase.google.com/docs/cli firebase login - In the project folder, run and pick your Firebase project, Android and iOS:
This createsflutterfire configurelib/firebase_options.dartand the Firebase config files for Android and iOS.
2. Add the packages and the code
flutter pub add firebase_core firebase_messaging
Copy addons/push/push_notifications.dart to lib/addons/push_notifications.dart.
In lib/main.dart, start it after the store is created:
import 'addons/push_notifications.dart';

Future<void> main() async {
  WidgetsFlutterBinding.ensureInitialized();
  final store = await AppStore.create();
  runApp(ShopNativeApp(store: store));
  store.refresh();
  PushNotifications.init(onMessage: store.addMessage); // ← add this line
}
3. Android
Android 13 and newer ask the user for permission; the add-on does that on first start. Nothing else is needed:
flutterfire configure already added the Google services files.
4. iOS (needs an Apple Developer account)
- In Xcode, open
ios/Runner.xcworkspace→ target Runner → Signing & Capabilities → add Push Notifications and Background Modes → Remote notifications. - In the Apple Developer portal create an APNs Authentication Key (.p8).
- Firebase console → Project settings → Cloud Messaging → Apple app configuration → upload the key, with your Key ID and Team ID.
5. Send a notification
Firebase console → Messaging → New campaign → Notifications:
- Title and text as you like.
- Target: Topic
all(every app user is subscribed). - Additional options → Custom data: key
link, value one of:
| Value | Opens |
|---|---|
/products/<product-handle> |
that product |
/collections/<collection-handle> |
that collection |
/cart |
the cart |
/ |
home |
https://… |
a web page in the in-app browser |
Messages that arrive while the app is open are added to the in-app notifications list (bell icon).
Testing
Run the app in debug mode: the device's push token is printed in the console (Push token: …). In the Firebase
console use Send test message with that token.
Removing it again
Delete lib/addons/push_notifications.dart, the PushNotifications.init line, run
flutter pub remove firebase_core firebase_messaging, and delete lib/firebase_options.dart and the Firebase
config files.
Changelog
1.0.0
First release.
- Native Shopify storefront for Android and iOS from one Flutter codebase.
- Home: banner carousel with translatable text, New Arrivals, collection rows from the store menu.
- Collections, product lists with paging, search with instant results.
- Product page: gallery with zoom, variant options (sold-out aware), description, related products, availability check, call for price, optional tax labels.
- Sale prices: products with a Shopify compare-at price show a "Sale" badge and the old price struck through
(product page: per variant, with the discount in percent). Badge color:
salein the brand colors. - Cart, wishlist, notifications; Shopify checkout inside the app with order confirmation.
- Customer accounts (Shopify Customer Account API): sign in, profile, orders, addresses; signed-in checkout.
- Glass design, light/dark mode, multiple languages with right-to-left support (English and Arabic included).
- Works offline from cache. One configuration file;
tool/rebrand.dartfor the native projects.
Licenses
ShopNative
The ShopNative source code is licensed to you under the CodeCanyon / Envato Market licence you purchased (Regular or Extended). See https://codecanyon.net/licenses/standard.
Brand assets
The "Luma Store" logo, symbol and app icon in assets/brand/ were created for the ShopNative demo and may be
replaced freely. "Luma Store" is a fictional demo brand.
Demo photos
The banner and collection photos seen in the demo store and screenshots are from Pexels (Pexels License) and are
not included in this download (only small screenshots of the app in docs/images/). Use your own images. Credits are in docs/DEMO_CREDITS.md.
Open-source packages
All packages used by the app have permissive licences (BSD, MIT, Apache 2.0). Their notices are shown in the app under Settings → Open-source licenses (Flutter collects them automatically).
Direct dependencies:
| Package | Version | Licence |
|---|---|---|
| crypto | 3.0.7 | BSD-3-Clause |
| flutter | SDK | BSD-3-Clause |
| flutter_localizations | SDK | BSD-3-Clause |
| flutter_web_auth_2 | 5.1.0 | MIT |
| http | 1.6.0 | BSD-3-Clause |
| path_provider | 2.1.6 | BSD-3-Clause |
| shared_preferences | 2.5.5 | BSD-3-Clause |
| url_launcher | 6.3.2 | BSD-3-Clause |
| webview_flutter | 4.14.1 | BSD-3-Clause |
Including transitive packages: BSD-3-Clause ×60, MIT ×4, Apache-2.0 ×3.
Icons: Material Icons (Apache 2.0), bundled with Flutter. Fonts: the device's system font (no fonts bundled).
Photo credits: Luma Store demo images
All photos are from Pexels and used under the Pexels License (free for commercial use; attribution not required but given here). License: https://www.pexels.com/license/
Images were cropped, resized and colour-graded for the Luma Store demo.
| Used for | Photographer | Source |
|---|---|---|
| 1-new-arrivals (banner + collection image) | cottonbro studio | https://www.pexels.com/photo/woman-standing-by-the-water-5263307/ |
| 2-women (banner + collection image) | MART PRODUCTION | https://www.pexels.com/photo/studio-shoot-of-a-woman-with-prosthetic-leg-8437008/ |
| 3-men (banner + collection image) | cottonbro studio | https://www.pexels.com/photo/a-man-wearing-a-white-shirt-over-a-turtleneck-7764067/ |
| 4-accessories (collection image) | Marina M | https://www.pexels.com/photo/woven-bags-on-the-table-8356229/ |
| 4-accessories (banner) | Minne Yaël Photographie | https://www.pexels.com/photo/close-up-of-a-brown-hat-lying-on-beige-fabric-17068555/ |
Using these photos
- The photos are loaded from the demo store; the image files are not part of this download. Use your own images for your store.
- The Pexels License allows commercial use and modification, but not selling or redistributing unaltered copies of the photos.
Support
Most questions are answered in this documentation; see Troubleshooting first.
If you need help, contact us with your purchase code, your Flutter version (flutter --version) and a screenshot or
the error message:
- Email: devapptics@gmail.com
- Phone: +1 (213) 658-4875
- Or use the comments / support tab on the CodeCanyon item page.
Support covers questions about the item, bugs, and help with the setup described here. Custom changes and installation services are not part of item support.
Installation and publishing service (paid, optional)
If you prefer, we can set up and publish the app for you. This is a separate paid service, quoted per project; it is not included in the item price.
What we do
- Connect the app to your Shopify store and set up the Headless channel and customer accounts
- Apply your app name, package name, logo, app icon, colours and languages
- Build the release versions for Android and iOS
- Prepare the store listings and submit the app to Google Play and the App Store
What you provide
- Your purchase code
- Access to your Shopify store as a collaborator or staff account (no passwords needed)
- App name, logo (PNG or SVG), app icon (1024 × 1024 px) and brand colours
- Your own Google Play Console account (one-time Google fee), with us invited as a user
- Your own Apple Developer Program account (yearly Apple fee), with us invited in App Store Connect
- Store listing texts: short and full description, support email and your privacy policy URL
The developer accounts stay in your name, so you keep full ownership of your apps. Store review times are set by Google and Apple.
To request a quote, email devapptics@gmail.com with the subject "ShopNative setup" and your purchase code.